有关使用 Android Studio 将 OneSignal Android 移动应用程序 SDK 添加到您的 Android 或 Amazon Kindle Fire 应用程序的说明。
要求
OneSignal 应用程序 ID,可在“设置”> “密钥和 ID”中找到
安装了“Google Play 商店(服务)”的 Android 5.0+ 设备或模拟器
设置
1.添加SDK
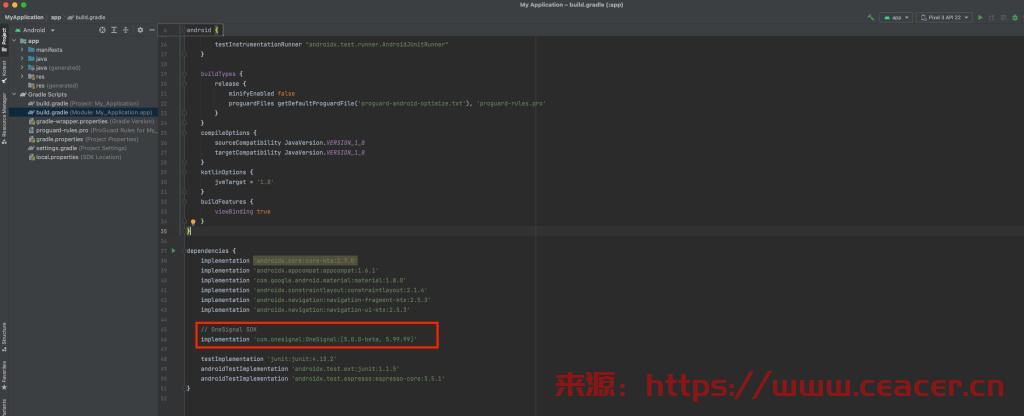
打开您的应用程序文件,将以下内容添加到您的部分。build.gradle (Module: app)dependencies
Gradle 构建定义了项目及其任务和依赖项。在这里,我们将 OneSignal SDK 声明为项目的外部依赖项。有关更多详细信息,请查看Gradle 的构建脚本文档。

同步Sync
请确保在保存后弹出的横幅上按“立即同步(Sync Now)”!
2. 初始化
重要的
将以下代码添加到类中的方法中。如果您没有应用程序类,请遵循我们的创建应用程序类指南。onCreateApplication
SDK 需要一个 Android Context 来监听应用程序的前台更改。Activity 也是一个 Context,因此 SDK 可以利用它,但是如果您仅在其中初始化 OneSignal,则可能无法覆盖应用程序的所有入口点。此外,还有一些边缘情况,例如应用程序冷启动但恢复到特定的活动,在该活动中它不会触发您的. 这就是为什么我们建议遵循创建应用程序类指南。MainActivityonCreateMainActivity
您可以在仪表板 设置 >密钥和 ID中找到。ONESIGNAL_APP_ID
Kotlin
import kotlinx.coroutines.CoroutineScope
import kotlinx.coroutines.Dispatchers
import kotlinx.coroutines.launch

import com.onesignal.OneSignal
import com.onesignal.debug.LogLevel

// NOTE: Replace the below with your own ONESIGNAL_APP_ID
const val ONESIGNAL_APP_ID = "########-####-####-####-############"

class ApplicationClass : Application() {
   override fun onCreate() {
      super.onCreate()

      // Verbose Logging set to help debug issues, remove before releasing your app.
      OneSignal.Debug.logLevel = LogLevel.VERBOSE

      // OneSignal Initialization
      OneSignal.initWithContext(this, ONESIGNAL_APP_ID)

      // requestPermission will show the native Android notification permission prompt.
      // NOTE: It's recommended to use a OneSignal In-App Message to prompt instead.
      CoroutineScope(Dispatchers.IO).launch {
         OneSignal.Notifications.requestPermission(true)
      }
   }
}
java
import com.onesignal.OneSignal;
import com.onesignal.debug.LogLevel;
import com.onesignal.Continue;

public class ApplicationClass extends Application {

    // NOTE: Replace the below with your own ONESIGNAL_APP_ID
    private static final String ONESIGNAL_APP_ID = "########-####-####-####-############";

    @Override
    public void onCreate() {
        super.onCreate();

        // Verbose Logging set to help debug issues, remove before releasing your app.
        OneSignal.getDebug().setLogLevel(LogLevel.VERBOSE);

        // OneSignal Initialization
        OneSignal.initWithContext(this, ONESIGNAL_APP_ID);

        // requestPermission will show the native Android notification permission prompt.
        // NOTE: It's recommended to use a OneSignal In-App Message to prompt instead.
        OneSignal.getNotifications().requestPermission(true, Continue.with(r -> {
            if (r.isSuccess()) {
              if (r.getData()) {
                // `requestPermission` completed successfully and the user has accepted permission
              }
              else {
                // `requestPermission` completed successfully but the user has rejected permission
              }
            }
            else {
              // `requestPermission` completed unsuccessfully, check `r.getThrowable()` for more info on the failure reason
            }
        }));
    }
}


![[发布于2024/11/17]长期可用免费V2ray订阅+获取地址](https://www.ceacer.cn/zb_users/theme/aymthirteen/style/images/no-image.jpg)


评论留言